How to Extend Ironer belts Lifespan via Correct Installation Tension: A 2026 Professional Guide
In the commercial laundry industry, maintaining the correct tension of your ironing belts is the single most important factor in ensuring equipment efficiency and longevity. Whether you are using Polyester or Aramid (Nomex) belts, improper tension—either too high or too low—will lead to costly downtime.
Below is a professional analysis of the problems caused by incorrect tension and how to identify them. |
|
 |
Part 1: The Dangers of Over-Tensioning
Excessive tension is a "silent killer" for both your belts and your ironer’s mechanical components.
1. Premature Bearing and Roller Failure
This is the most serious mechanical issue. An over-tightened belt acts like a taut string, putting immense radial pressure on the roller bearings.
* Impact: Prolonged overload can cause bearing overheating, lubrication failure, and eventual seizure.
* Consequences: Not only will expensive bearings need to be replaced, but severe tension can even cause slight bending or deformation of thinner support shafts or rollers.
2. Physical Damage to belt Fibers
Even high-strength aramid (Nomex) or polyester fibers have limited tensile strength.
* Impact: Excessive tension will cause the fibers to be under overloaded stretching for a prolonged period, leading to loss of elasticity (molecular chain breakage).
* Result: The ironing belt will rapidly thin and harden, lose its ability to absorb moisture, and eventually cause the entire belt to become brittle and break suddenly.
3. Steel Fastener (Clipper) Damage
The steel fastener is the weakest link in the entire ironing belt.
* Impact: Excessive tension will directly affect the fastener(clipper) or the seam of the fastener.
* Result: The fasteners being prone to straightening or pulling out from the belts. If the fastener breaks, the high-speed belt may whip inside the equipment, causing secondary damage.
4. Linen Stretching and Deformation
An overly tight belt applies unnecessary tension to the linens (sheets, tablecloths) passing through.
* Impact: Especially at high temperatures, wet linen fibers are highly malleable.
* Result: The finished linens may change shape after ironing (e.g., a rectangle becomes a trapezoid), or alignment difficulties may occur at the folding machine.
5. Increased Motor Load and Energy Costs
* Impact: To drive an overly tight belt, the motor must output greater torque.
* Result: The motor will frequently overheat due to current overload, potentially triggering thermal overload protection (tripping). Long-term operation will significantly shorten motor life and substantially increase electricity costs.
 Expert Pro Tip: How to detect Over-Tension?
- Noise: Listen for a dull rumble sound from the bearing.
- Tactile: If the belt is stiff like a steel plate during operation, with no deflection, it usually indicates overload.
- Visual: Check for gaps in the clippers.
Part 2: The Problems Caused by Low Tension Belts
1. Flatwork Ironer belts Slippage and Power Loss
When tension is insufficient, the drive roller cannot generate enough friction to move the ironing belts. Frequent slippage creates extreme friction heat, which can harden, glaze, or even "burn" the belt material, permanently damaging its structural integrity.
2. Linen Wrinkles and Reduced Ironing Quality
One of the main functions of the ironing belts is to smooth linens as they pass through the rollers. Insufficient tension on ironer, folder, or feeder belts makes it hard for them to smoothly adhere to the linen surface. This fails to pull the linens through evenly, making them prone to wrinkles, waviness, or water stains during ironing, which necessitates rework.
3. Ironer belts Tracking Issues and Edge Wearing
A common misconception is that only uneven tension causes belt misalignment. In fact, insufficient overall tension can cause the belt to "drift" on the rollers.
* Symptom: The belt lacks sufficient restraint to stay centered and tends to swing significantly to the left or right.
* Consequence: The belt edges frequently impact the equipment side panels or frame, causing fraying and tearing.
4. Static Electricity Buildup
Loose tension on ironer, folder, or feeder belts leads to easier static buildup while running. Linens tend to stick to the belts and fail to fall smoothly (especially at the folding machine exit), causing blockages.
Expert Pro Tip: How to quickly detect Low Tension?
During equipment operation, observe the idler roller. If you can easily stop the running belt by hand (safety first!), or see a noticeable sagging of the belt from the side, the tension needs to be increased by at least 10%-15%.
Installation Guide: Proper Tension Adjustment for Ironing belts
Determine the Baseline Elongation for the Material
Different materials have different physical limits; the ideal elongation range is as follows:
Material |
Initial Elongation |
Working Temp |
| Polyester |
1.5% - 2.0% |
< 160°C |
| Aramid / Polyester |
1.2% - 1.5% |
< 200°C |
| Aramid / Nomex |
1.0% - 1.5% |
> 200°C |
| Felt Padding |
2.0% - 3.0% |
150°C - 190°C |
| Cotton |
2.5% - 3.5% |
— |
Technical Guide: Ironer belt Installation and Tension Adjustment
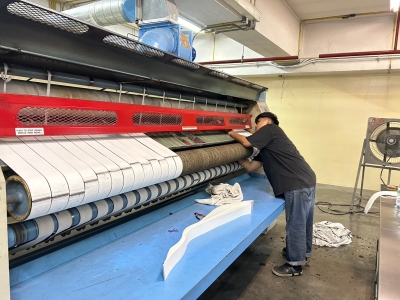
Step 1: Pre-Installation Cleaning
Clean the roller to make sure there is no residual wax or impurities.
Step 2: Measure Actual Tension via the Marking Method
This is the most accurate measurement method for on-site factory installation.
1. Marking: On the fully relaxed outer surface of the aramid/polyester ironing belt, draw two marker points spaced 1000mm apart.
2. Tensioning: Begin applying pressure by adjusting the tension roller.
3. Verification: Measure the distance between the two points. If the material requires an elongation of 1.5%, then under ideal tension, this distance should be 1012mm to 1015mm.
Step 3: Segmented Pressurization
Gradually increase tension using adjusting bolts or pneumatic devices.
Option 1: Using Manual Adjusting Bolts (Mechanical)
1. Alignment First: Tighten the bolts on both sides until the belt is straight and has no visible sag.
2. The "Turn" Rule: Rotate the bolts 1-2 full turns at a time. Ensure both sides are adjusted equally to prevent tracking issues.
3. Heat Run: Start the ironer and let it reach working temperature. The belt will naturally expand or contract.
4. Final Check: After 30 minutes of heating, give a final half-turn if any slippage is detected.
Option 2: Using Pneumatic Tensioning (Automatic)
1. Initial Low Pressure: Set the air regulator to 40% of the target pressure to position the belt.
2. Incremental Increase: Once the machine is running, increase the pressure to 70%. This allows the belt fibers to settle on the rollers.
3. Full Load: After 1-2 hours of operation, set the regulator to the final design pressure specified in your machine manual.
4. Monitor Gauge: Check the pressure gauge daily to ensure the system is maintaining constant tension.
Step 4: Load Operation Test and Fine-Tuning
1. Start-up Test: Run the machine at full load (filled with wet linens) and at operating temperature.
2. Observation and Judgment: If there is no pause or sharp friction sound from the belt upon feeding, the tension is sufficient.
3. Fine-tuning: Ideally, it should be "better loose than tight." If the belt does not slip during the test, there is no need to further increase the tension. This practice protects the bearings and extends the lifespan of the equipment.
Frequently Asked Questions (FAQ)
Q: How do I know if my ironer belt tension is too high?
A: Signs of over-tensioning include distorted belt joints (fasteners), a noticeable narrowing of the belt width, or the motor running at a higher than normal temperature. If the belts "vibrate" loudly during operation, the tension is likely too high.
Q: What happens if the tension is too loose?
A: If the tension is too low, the belt will slip on the drive roller. This causes friction heat, which can scorch the belt fibers and lead to premature failure. It also causes uneven ironing quality or "folding" of the linens.
Q: Should I re-adjust the tension after installing a new belt?
A: Yes. New belts typically experience "initial stretch." We recommend checking the tension after the first 8 hours of operation and again after 24 hours to ensure it remains within the optimal range.
Q: Does temperature affect belt tension?
A: Absolutely. Most materials like Polyester or Aramid will slightly expand or contract when heated. Always perform your final tension adjustment while the machine is at its full operating temperature.
Q: How can I ensure equal tension across all belts in a set?
A: Use a ruler to measure the exposed length of the adjustment bolts on both sides. For pneumatic systems, ensure the air cylinders are moving freely and not stuck, providing equal force to the tension roller.
 Need high-quality ironer belts for your machines? View our belts here